Pallet Coasters DIY: Step-By-Step Process And Creative Design Ideas
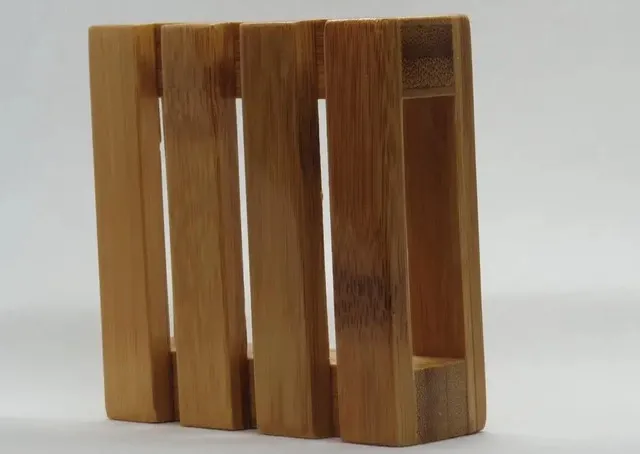
Pallet coasters DIY projects offer a fun and creative way to craft unique coasters with a rustic charm. These handmade coasters emulate the look of miniature wooden pallets and you can customize them to match your personal style or decor theme. Whether crafting for the home, a gift, or a craft fair, pallet coasters bring functional art to your tabletops. In this guide, we walk you through the supplies, steps, and creative variations required to craft your own pallet coasters. Using everyday materials like wood sticks, glue, and paint, you can create coasters that blend aesthetic appeal with practical function, and the possibilities are endless. Or, if you are less inclined to DIY, you can use our online store to create custom-designed coasters at competitive prices. Read on to learn more.

Key Takeaways
- Pallet coasters DIY projects are simple yet impactful, perfect for home decor or gifts, and there are many creative variations like seasonal or thematic designs.
- The process includes assembly, finishing, and optional customization to create a polished and personalized look.
- You only need simple supplies like popsicle sticks, wood glue, and optional decorations like paint or washi tape to make your coasters.
- We supply high-quality custom drink coasters at affordable prices so you can get coasters with a pallet design without the DIY hassle.
Table of contents
-
Pallet Coasters DIY
-
What Are The Supplies Needed To Make A DIY Pallet Coaster?
-
How Do You Assemble Pallet Coasters?
-
What Are The Final Steps To Finish And Personalize Your DIY Pallet Coasters?
-
What Are Some Creative Variations For DIY Pallet Coasters?
-
How Can You Make Mini Pallet Coasters With Popsicle Sticks?
Pallet Coasters DIY
Creating pallet coasters at home is an enjoyable and rewarding DIY project. These miniature coasters protect your furniture and offer a unique pallet aesthetic. If you want a fast, professional solution, work with us to create custom drink coasters. If you want to create your own at home, follow this step-by-step guide to help you craft your own pallet coasters.

Gather Your Supplies
Begin by collecting the materials and tools you will need for this project:
- Popsicle sticks or flat wooden slats
- Wood glue
- Sandpaper (medium and fine grit)
- Paint or wood stain
- Paintbrushes
- Clear sealant (Polyurethane or Mod Podge)
- Ruler
- Scissors or a craft knife
Optional supplies include stencils, markers, washi tape, or decals to embellish your coaster.
Prepare The Wooden Pieces
If your popsicle sticks are longer than you need, use scissors or a craft knife to trim them to size. Ensure all pieces are uniform to create a polished look. The thermal properties of wood outperform those of metals, marble, and glass in terms of insulating capacity, so it is a great material for coasters for hot drinks.
Sand the edges and surfaces of the sticks to eliminate splinters and ensure safe handling as you assemble your coaster.
Lay Out The Base
Arrange two or three popsicle sticks parallel to one another, leaving equal spacing between them. This will create the foundation of the pallet design for your coasters. Use a ruler to ensure straight alignment between the sticks as this will ensure the final product looks professional.
Assemble The Top Layer
Glue additional sticks horizontally across the base ones. Even spacing is important to mimic the look of a wooden pallet. Use wood glue sparingly to ensure no excess seeps out from the edges. Make sure the glue dries completely before you proceed to the next step.
Sand The Assembled Pallet
Once the glue has dried and you have a firm structure, sand the entire coaster thoroughly. We recommend using medium grit first to smooth out the rough areas, then switch to fine to achieve a refined finish. Special attention should be paid to the edges and corners for maximum safety and comfort.
Apply Paint Or Stain
Customize your pallet coaster by applying either:
- Wood stain for a natural look.
- Paint for a vibrant, colorful appearance.
Use a paintbrush for even coverage and let each coat dry completely before applying the next. For more intricate designs, consider using stencils or hand-painting decals, or you could apply text, patterns or decals over the paint once dried.
Seal The Coaster
To ensure your coaster is protected against spills and wear, apply a clear sealant. Spray-on polyurethane works well, or you could use Mod Podge. Make sure the entire surface, including the edges, is sealed for maximum durability. Give the sealant at least 24 hours to dry fully to make your coaster waterproof.

What Are The Supplies Needed To Make A DIY Pallet Coaster?
To craft DIY pallet coasters, you will need various essential materials. This is one of the more creative and charming coaster ideas to make at home, and it is relatively easy to make with simple crafting supplies. From popsicle sticks to marker pens, here are the essential and options supplies for your pallet coaster plans:
- Popsicle sticks or flat wooden slats for the main structure
- Wood glue for assembly
- Sandpaper to smooth rough edges
- Paint or wood stain for customization
- A clear sealant to make it waterproof
- Marker pens
- Stencils
- Washi tape
The last three items are optional supplies for adding artistic flair to your coasters.
The global coaster market is seeing trends toward eco-friendly materials, augmenting the demand for coasters. Thus, by making your own DIY pallet coasters from wooden sticks, you are actually tapping into a major market trend. Sourcing these materials is simple as you can purchase popsicle sticks in bulk from craft stores or online, or you could use recycled wood pieces or leftover crafting supplies.
Adding embellishments like decoupage patterns or decorative tapes transforms a simple pallet design into a coaster with charm and personality. Gather your supplies and get ready to craft versatile, charming additions to your table settings or thoughtful handmade gifts for any occasion.
Get your hands on our unique designs and personalize your home today!
Protect your furniture in style with our custom coasters!
Order now and elevate your living space!
How Do You Assemble Pallet Coasters?
It will take careful handling and patience to assemble your pallet coasters in a seamless and professional way. The basic structure is fairly simple, but you need to ensure you get optimal alignment and achieve a strong and smooth assembly to make your coaster durable and ergonomically sound.
Let’s look at the steps to achieve a well-assembled pallet coaster:
- Arrange your wooden sticks or slats into a miniature pallet structure so you get the general idea of what you are trying to achieve.
- Lay out three horizontal base sticks as the foundation of your miniature pallet. Equal spacing and parallel alignment are essential.
- Align and glue more sticks vertically on top. They should be spaced evenly for a neat pallet look. Make sure you give the glue ample time to dry fully for a stable structure.
- Once the structure is formed, sand all the edges to create a smooth finish and ensure there are no splinters.
- Apply wood stain to enhance the frain of your wood slats or sticks, or give the pallet coaster a unique finish by painting it.
Remember, coasters are used for protecting tabletops against condensation, spills, scrapes, and heat damage. But they are also decorative accents that enhance the aesthetic in your space. Thus, you can tape off sections for clean designs or stencil patterns for a professional appearance. When ready, apply a clear sealant to make your coaster waterproof.
What Are The Final Steps To Finish And Personalize Your DIY Pallet Coasters?
We have talked in detail about assembling the pallet structure for your DIY coasters, but the final steps are extremely important. Finishing and personalizing your pallet coasters elevates them from functional to fabulous and have them ready to adorn your tables and protect against beer mugs and other glassware.
Here are some tips for finalizing your DIY pallet coaster design:
- Once assembled and sanded, you can distress the wood with sandpaper to create a more rustic aesthetic.
- Apply wood stain to preserve the natural wood look and further enhance the rustic charm.
- If you prefer a more colorful design, paint the surface with vibrant hues or intricate patterns.
- Personalize the coasters further by adding some custom text, like initials or quotes, with paint pens or vinyl decals.
- Decoupage techniques are another option, whereby you attach patterned paper or photographs to create one-of-a-kind designs.
Once you have finished personalizing the coaster, it is time to apply a protective sealant. Mod Podge or polyurethane spray are good options to safeguard against spills and wear. These finishing touches ensure your coasters tick the boxes for being practical, visually striking, and tailored to your unique taste.
If you want the finished product without all the hard work, use our affordable online service to customize coasters from a wide range of materials and enjoy high-quality, professionally-crafted custom shaped coasters.
Impress your customers with our unique designs and personalized touch!
Elevate your restaurant's aesthetic with our custom coasters!
Order now and add a touch of class to your establishment
make your custom coastersWhat Are Some Creative Variations For DIY Pallet Coasters?
If you want a creative twist on the standard DIY pallet coaster, you actually have various options at your disposal. You could augment the shape of the design, add some colors and patterns, or apply a thematic design. You could even experiment with different materials to take the custom element in a different direction.
Let’s look at these choices in a little more detail:
- Different shapes: Try making your pallet coasters in circular or hexagonal designs instead of the traditional rectangular layout.
- Colorful creations: You can incorporate color by painting the coasters and embellishing further with patterned washi tape, hand-painted designs, or stenciled motifs.
- Themed designs: Seasonal variations are always a hit. Create themed coasters for holidays like Christmas or Halloween with festive colors and symbols. Or make spring-inspired coasters with floral patterns, or summer designs with beachy hues.
- Experiment with materials: One good option is to use distressed wood to capture the pallet aesthetic with a vintage look. Or you could use vibrant acrylic paints to match decor trends.
Consider creating these customized pieces as gifts, tailoring the look to the recipient’s tastes. Or you could enhance their appeal further by experimenting with multiple design techniques like decoupage or engraving.
If all the DIY work isn’t your preference, you could create your custom pallet design and upload it to our online store. We can create custom beer coasters from a range of materials with virtually any design you want and deliver high-quality pieces at affordable prices, with bulk discounts available.
Work with us to bring your vision to life.

How Can You Make Mini Pallet Coasters With Popsicle Sticks?
Making mini pallet coasters with popsicle sticks is quite simple to do, and it is a budget-friendly project that can yield fantastic results. The wood material is also very good at insulating against heat, which is important if you are looking to create coasters for hot drinks.
Let’s look at the simple process to create mini pallet coasters from popsicle sticks:
- Prepare the sticks: Cut your popsicle sticks to size if needed, ensuring they are uniform for a polished appearance.
- Arrange your base: Lay down three sticks horizontally as the base, ensuring they are parallel to one another.
- Add a second layer: Now, glue three more sticks perpendicularly across the top of the base, ensuring a parallel layout and uniform distribution.
- Sand the sticks: Once the glue is dried, you have the basic structure. Now you must sand the edges to smooth rough surfaces.
- Add a creative touch: You are now ready to personalize your mini pallets with wood stain, vibrant paints, stencils, or decals.
- Finish the coasters: Once you are satisfied with your personalization and everything is dry, seal the coasters with a clear varnish to protect them from water damage.
These miniature pallet coasters make great gifts or they could enhance your home decor with a personalized, handcrafted touch. With their wooden structure and sealed finish, they are excellent for protecting tabletops against hot coffee mugs and chilled glassware alike. They are simple to build, fun to personalize, and highly effective as practical and aesthetic additions to any space.
Personalize them with your names, date, and special message
Make your wedding day unforgettable with our custom coasters
Order now and cherish the memories of your special day forever.
Frequently Asked Questions About Pallet Coasters DIY
How Do You Seal The Pallet Coasters DIY?
You have several options to seal pallet coasters. You could apply a clear wood varnish, use polyurethane spray, or spread some Mod Podge over the surface. Ensure the surface is dry before apply a sealant.
What Are The Supplies You Need To Make DIY Pallet Coasters?
You will need popsicle sticks or small wooden slats, wood glue, sandpaper, and optional embellishments. You will also need a sealant to complete the project.